Database
Crossfeed uses a relational database that uses Postgres. When running Crossfeed locally, the database is served from the container crossfeed_db_1. We rarely issue direct SQL queries to the database, but instead
use TypeORM to communicate with it.
Directory structure
The backend/src/models folder contains all the TypeORM models.
The database is deployed onto AWS RDS. Configuration for this deployment is located in infrastructure/database.tf.
Models
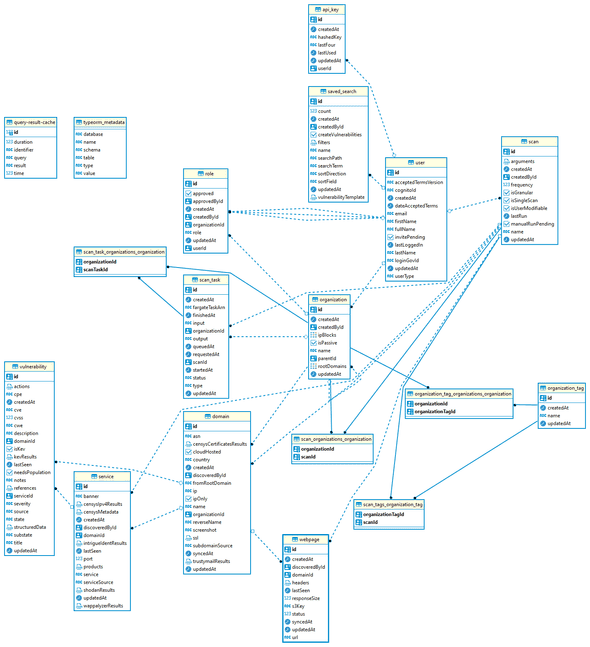
Here is a list of database models used by Crossfeed:
| Model Name | Description |
|---|---|
| Domain | A Domain stores a record for each domain / subdomain found by Crossfeed. |
| Service | A Service runs on a given port on a domain, for example, "http" or "ftp". |
| Vulnerability | A Vulnerability is an indicator of a vulnerability, unique to a domain, such as a CVE. |
| Webpage | A Webpage is a web path that has been scraped on a Domain. |
| ApiKey | An ApiKey can be generated by users to programmatically access the Crossfeed API. |
| Organization | An Organization represents an entity to be scanned that has a defined scope of root domains. |
| OrganizationTag | An OrganizationTag can be used to group multiple organizations. |
| Role | A Role represents a User's access level to an Organization. |
| User | A User is an account that can access Crossfeed. |
| SavedSearch | A SavedSearch is a search that a User has saved. |
| Scan | A Scan is a scheduled data collection job. |
| ScanTask | A ScanTask represents a specific run, at a certain time and date, of a Scan. |
Entity-relationship Diagram of the Database
 * Generated with DBeaver
Syncing the database
You should sync the database using the syncdb command whenever models change and
you want to update the database schemas.
cd backend
# Generate schema
npm run syncdb
# Populate sample data
npm run syncdb -- -d populate
Manual access
To manually access the database, we use AWS Session Manager. This way, we don't need to run an EC2 bastion instance that's exposed to the public Internet.
-
Install the Session Manager plugin to the AWS CLI on your development machine.
-
Set up a Session Manager port forwarding session to allow SSH access to the instance.
# Set this environment variable to the ID of the EC2 bastion instance (which should be in a private subnet, but able to connect to the RDS instance). export INSTANCE_ID= # Generate an SSH key and send it to the EC2 instance # (this only needs to be done once). ssh-keygen -f cisa_bastion_rsa aws ec2-instance-connect send-ssh-public-key \ --instance-id $INSTANCE_ID \ --availability-zone us-east-1b \ --instance-os-user ec2-user \ --ssh-public-key file://cisa_bastion_rsa.pub # Start port forwarding. aws ssm start-session \ --target $INSTANCE_ID \ --document-name AWS-StartPortForwardingSession \ --parameters '{"portNumber":["22"], "localPortNumber":["9999"]}' -
In another terminal, forward the RDS connection to your local computer using the SSH connection from earlier:
# Set this environment variable to the URL of the RDS instance (XXX.rds.amazonaws.com) export RDS_URL= # Forward RDS instance to localhost:5432 ssh ec2-user@localhost \ -p 9999 \ -N \ -i cisa_bastion_rsa \ -L 5432:$RDS_URL:5432 -
You should now be able to connect to the database directly from your local computer (with the actual RDS database credentials), at the URL
localhost:5432. You can use a tool such as DBeaver to more easily handle / manage connections.
These steps for manual access are based on Connect to a private RDS instance using SSH & AWS SSM (Systems Manager).